The number of people meeting their shopping needs online is at a peak. As the options for international shipping become more varied and increasingly affordable, it’s time for online retailers to consider their logistics process from a global perspective.
Don’t get left behind of your competitors – there’s no better time to offer international shipping, and shipping cross-borders is easier than ever before. We’re here to take the hassle out of international shipping by helping you navigate the potential pitfalls of overseas delivery.
Stay ahead of the curve and read on to find out how to seamlessly ship overseas with Sendcloud.
Selecting multiple international shipping methods
Shipping internationally requires extra consideration over the shipping method you’re going to use. Do you want to ship based on the cheapest rates, the fastest delivery time or have insurance included against loss or damage?
Whatever your priority, we offer flexible international shipping solutions across the board. Once you’ve connected your webshop with Sendcloud, all of your orders are automatically imported into our platform so that you can manage your shipping preferences and begin creating your labels.
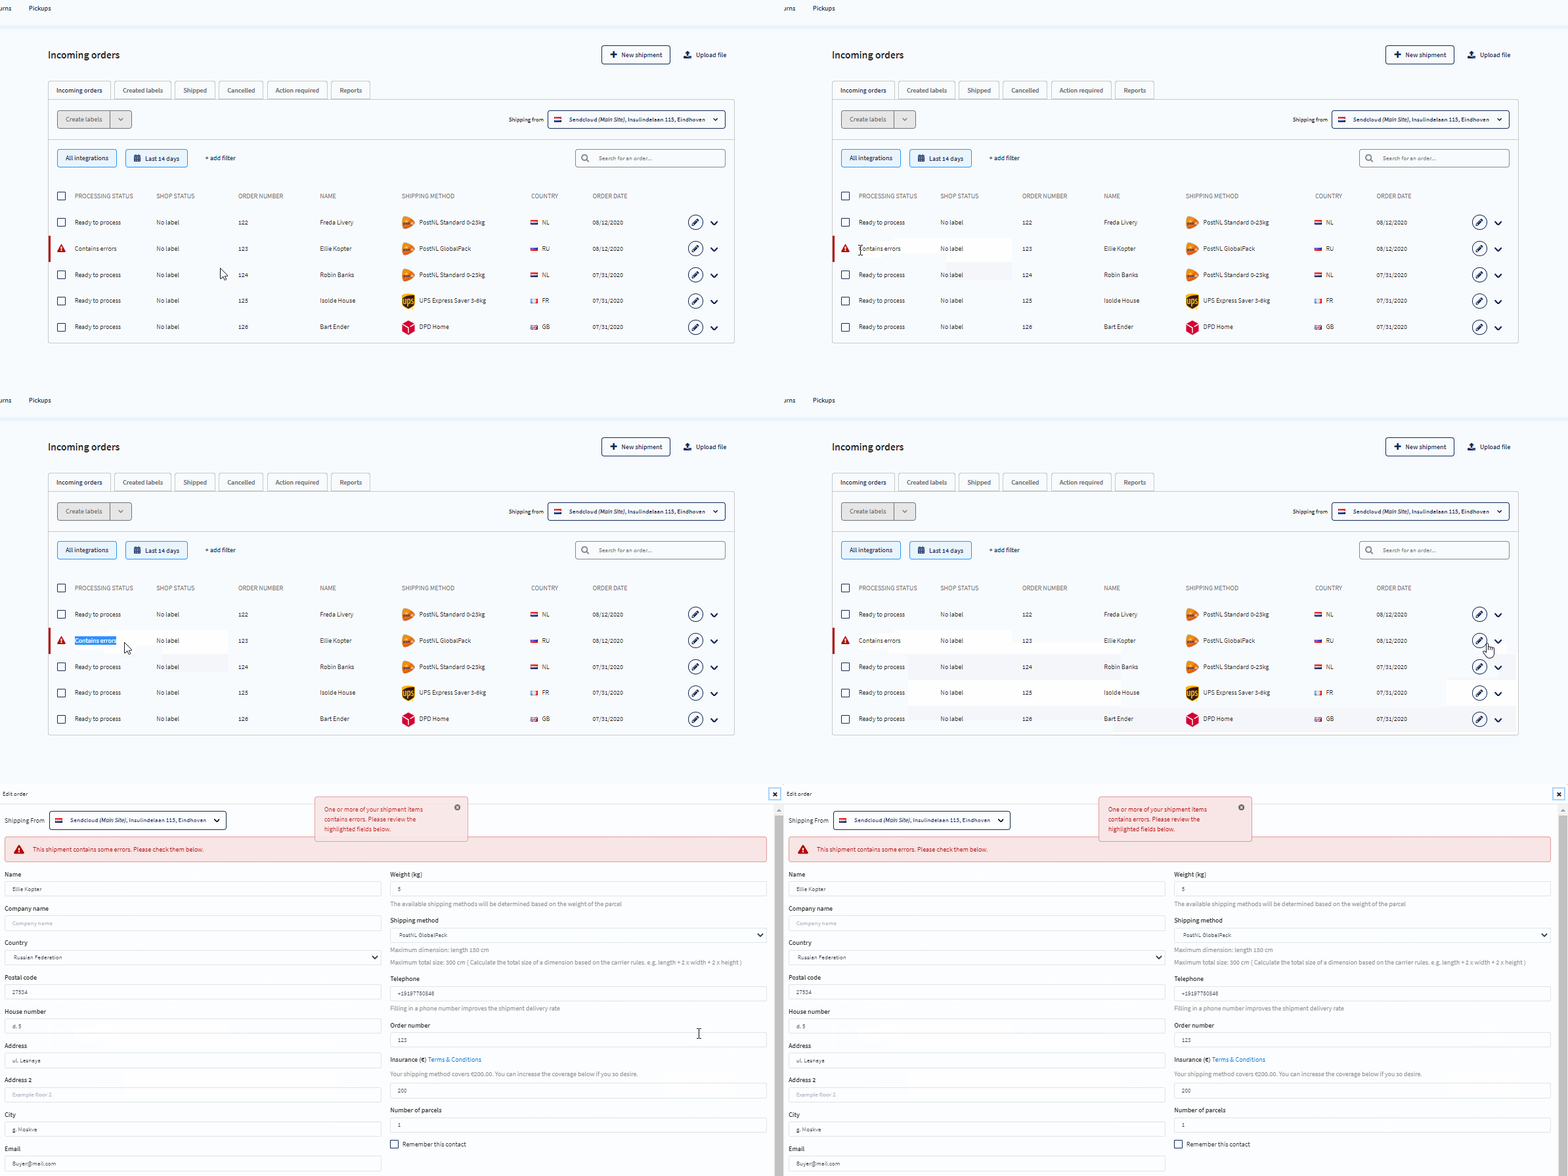
When an order with a destination country outside of the EU is retrieved from your online store, an international shipping method that’s available in your Sendcloud environment will be selected. The shipment will remain some action and is marked. You can instantly identify your international orders from your domestic shipments and decide how you want to handle it. The order has a “Contains error” message.
The next step is to choose your preferred international shipping method. Click on the pen icon next to the order to edit the method or choose the one that was preselected anyway.
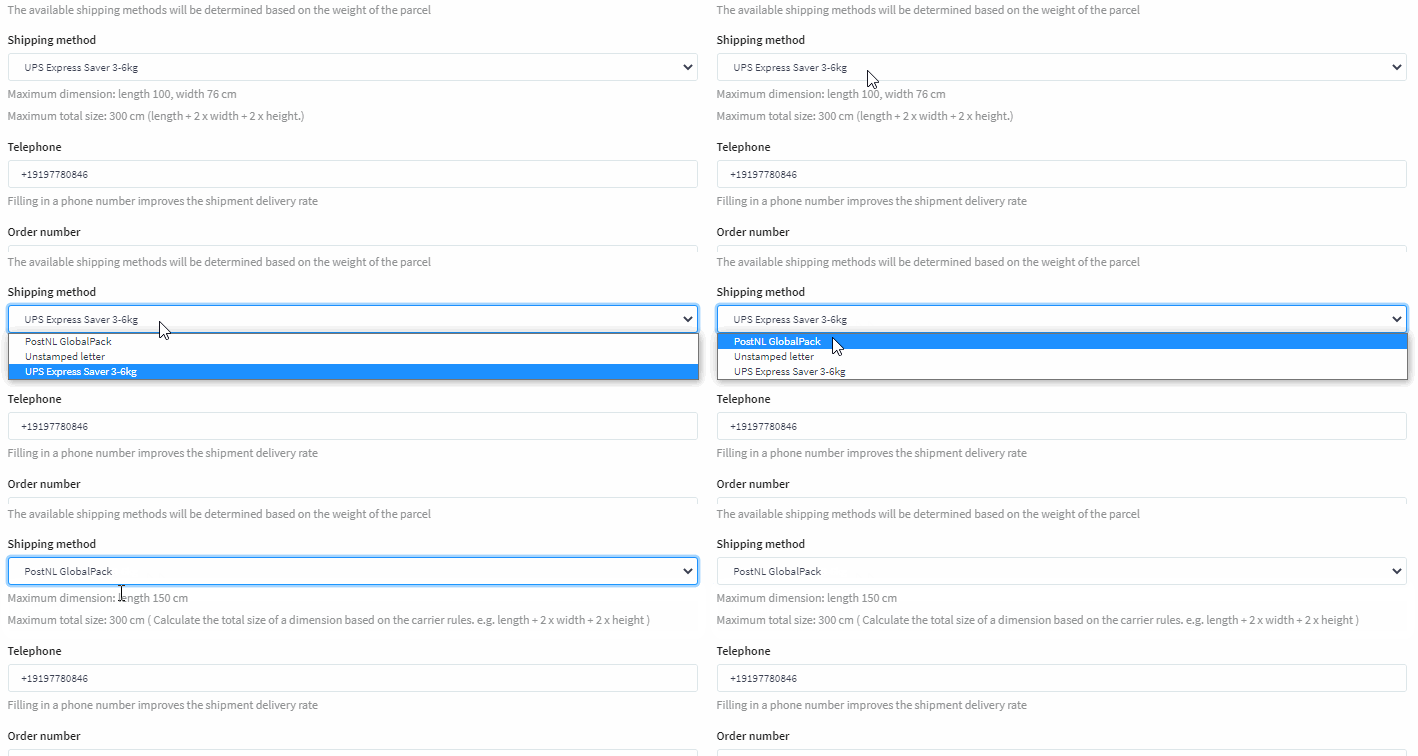
You can select your preferred shipping method from the order edit view. The drop down menu will display all the available shipping methods based on the carriers you have enabled in your account settings.
Compare international shipping rates with the Sendcloud price calculator
But how do you know which shipping methods you can use for your parcel? As usual, we’ve got you covered. Solely shipping methods that qualify for your parcel are available in your shipping methods. This means that if the weight of your shipment falls outside of the shipping criteria, that specific shipping method won’t be offered in the list. This reduces the chance of an unwanted surcharge because you’ve chosen an incorrect shipping method, and it saves you time trying to determine which shipping methods are suitable for your parcel.
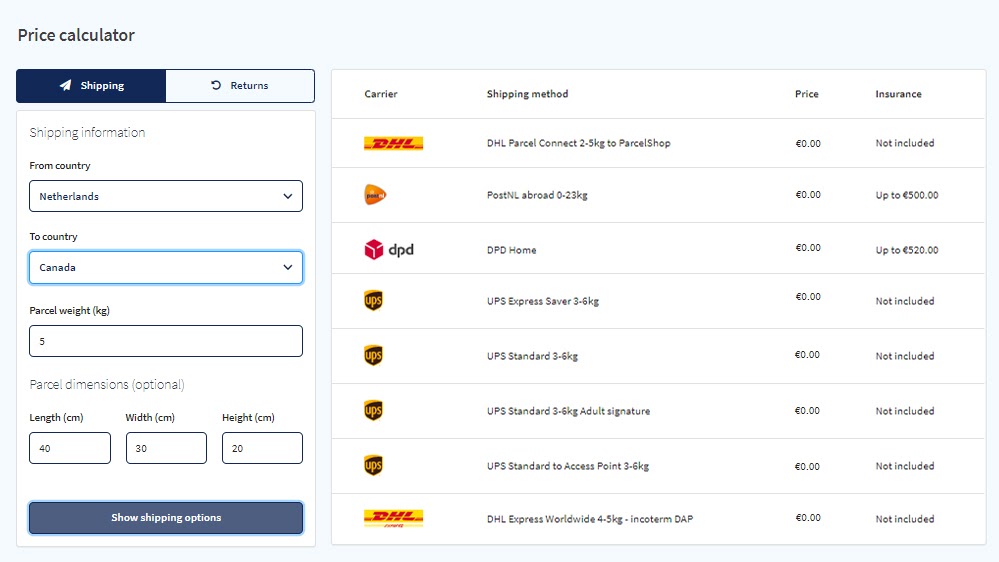
Want to see all available shipping options for your international parcel? You can check the rates and whether insurance is included with the shipment by using our price calculator. Use this handy tool to see all shipping possibilities and prices based on parcel size and destination country.
To use it, go to the Settings section of your Sendcloud account and select Price calculator. Enter the shipping from and to countries, the weight and the dimensions of your parcel, then click “Show shipping options”.
Ship international and smart with automated shipping rules
Using the method above, you can easily select your shipping method on an order-by-order basis. But what if you handle multiple international orders per day? You might prefer to have all orders to a specific destination country or EU status automatically shipped with your preferred carrier and shipping method. That’s where our shipping rules feature steps in.
You can apply smart shipping rules based on specific countries or EU/Non-EU status to automate the entire shipping method decision for you and your order picking team.
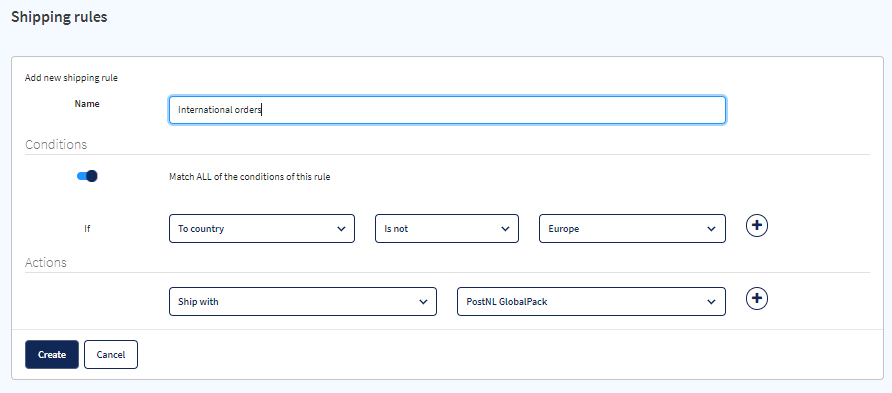
Shipping rules are a unique feature of our platform which let you create automatically applied actions to your incoming orders based on “if this, then that” logic. To create a shipping rule, go to Settings > Shipping rules and press “Create new”. Give your shipping rule a name to help you identify it, such as “International orders”. Then select the “if” condition which will identify applicable orders, and then determine an action to apply.
In the example below, we have created a shipping rule that will automatically change the shipping method to PostNL GlobalPack for all orders with a destination country outside of Europe. If you ship 50 international orders a day, this single rule alone could potentially save you up to 30 minutes per day.
Guarantee a safe journey for your parcels
If you’ve chosen a shipping method which doesn’t include insurance, or if the amount of coverage provided does not fully protect your parcel contents, you might want to consider additional protection for your packages.
International parcels travel thousands of miles of shipping network before reaching their destination. Accidents can and do happen, so if you’re shipping valuable or hard to replace products, insuring them for loss or damage removes some of the worry over international shipping.
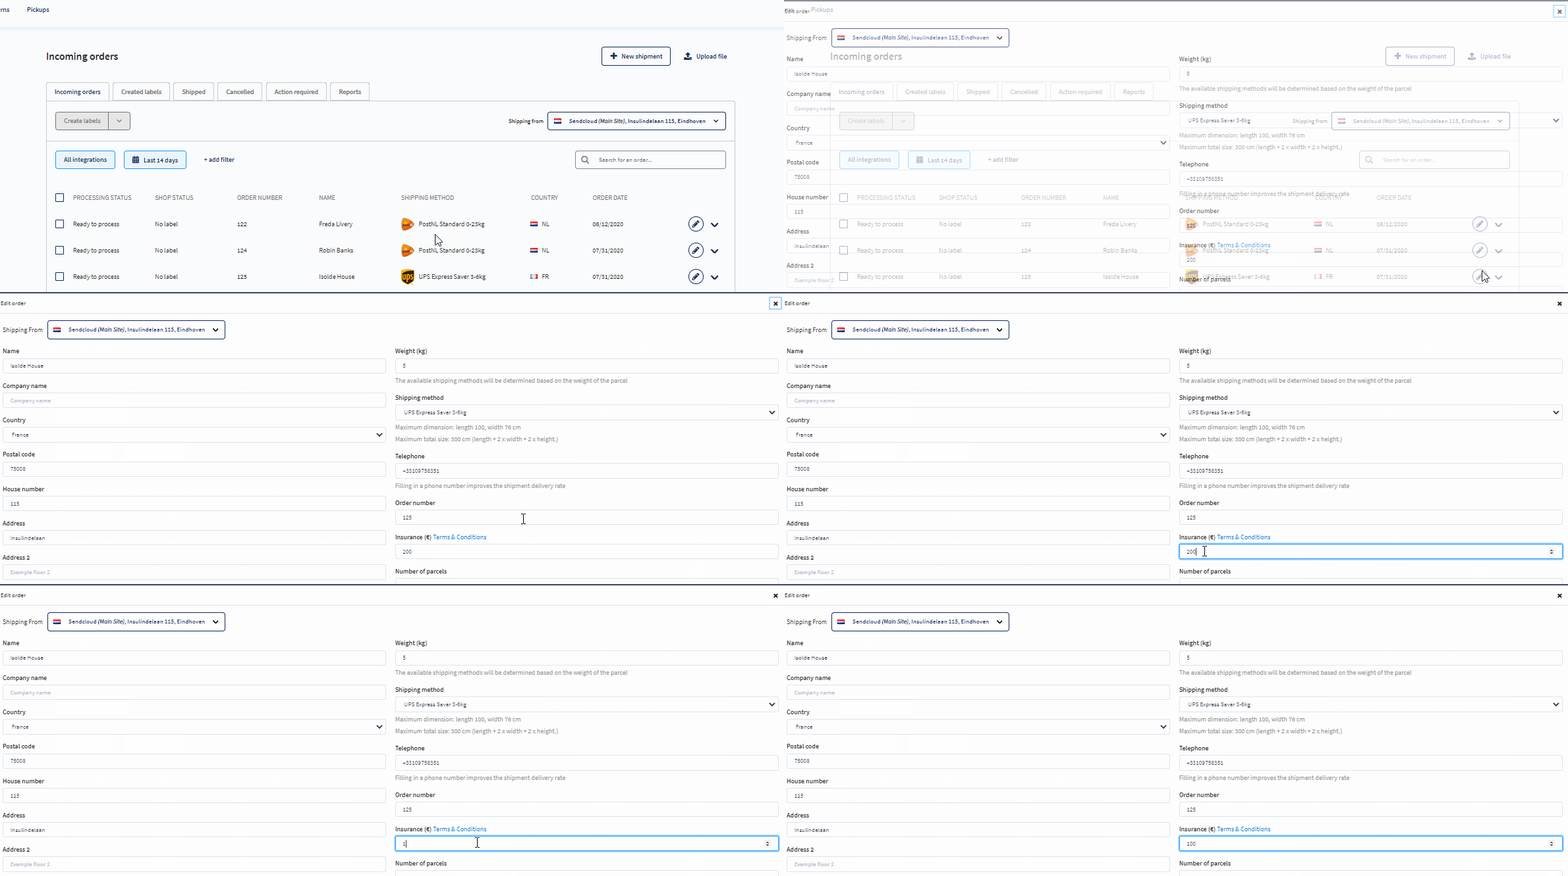
You can add Sendcloud insurance to your parcels by entering an insurance amount in the platform before printing your label and customs documents. Click the pen icon and enter the desired coverage amount in the order detail view. Don’t forget to hit save when you’re done.
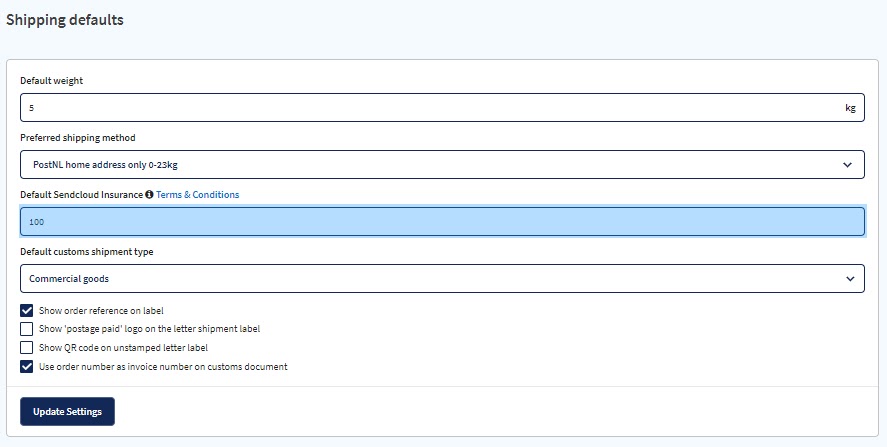
Insuring just one costly parcel is the work of less than half a minute, but what if you want to insure all your parcels without having to manually change each order? If there’s one thing we’re conscious of, it’s saving you time. That’s why you can also set a default insurance amount on all your orders by going to Settings > Shipping defaults.
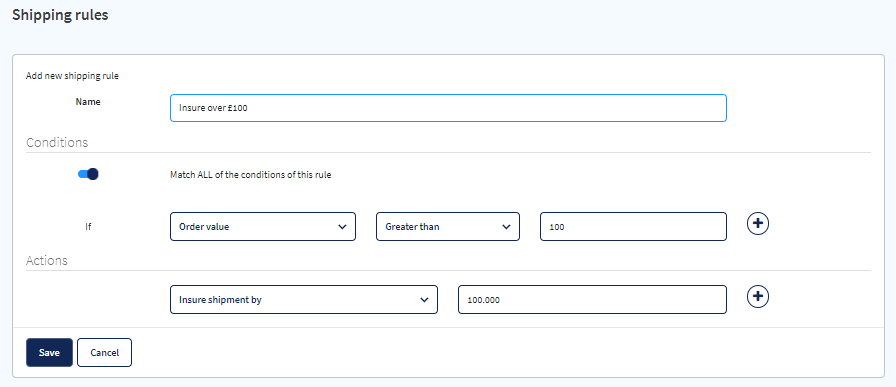
If you want to ship even smarter, you can also use shipping rules to protect parcels only above a certain value, or only if they’re travelling through customs borders. The example below shows a shipping rule which will automatically insure all orders with a total value over £100.
Don’t forget, shipping rules are fully customisable – you can even create a rule to apply insurance to all orders containing a specific product name or SKU number. After the initial setup, you’ll have to spend minimum effort ensuring that your orders ship correctly.
Once you’ve decided on your shipping method and whether to insure your parcels, the next step is to generate your customs documentation. Let’s take a look at how easy it is to create customs forms at the same time as printing your labels.
Automated customs forms generation with Sendcloud
If you’re currently shipping outside of the European Union, you’re probably already familiar with the dreaded process of custom document production. Knowing what kind of documents you need and which information to include is all part of the hassle of international shipping.
Good news – things are about to get easier. We’ve fully integrated automatic customs forms generation into the platform, so we do the work for you. Why waste time filling in customs forms by hand and fretting over which type of document you need? Print your label and your customs documents in one click. Let’s take a look at how customs documentation is handled in the Sendcloud platform.
Automatically create the right kind of customs form per carrier
Did you know that the kind of document you need to provide depends on the shipping carrier you choose? What about the difference between a commercial invoice and a CN23 form?
If you ship with multiple carriers, it can be confusing to know which forms you need for various shipping methods. Commercial carriers like UPS and DHL require a commercial invoice, whereas postal carriers like PostNL and Royal Mail need an additional CN22 or CN23 form. To complicate things further, every carrier has its own version of the required forms, which you have to download from them directly. If you don’t fill in the mandatory details exactly according to specification, you run the risk of having parcels delayed or returned and ending up with a disappointed customer on your hands.
That’s a situation everyone wants to avoid, and that’s where our shipping solution steps in. When you connect your online store to Sendcloud, we detect the type of document you need depending on the shipping method you choose. All you have to do is fill in your product information and your customs form will print right alongside your label. It’s hard to believe that international shipping is about to become stress-free, but trust us on this one – it really is as easy as it sounds.
How to create your customs documentation
Once you’ve set up your shipping defaults and located an order in your panel that’s shipping outside of the EU, it’s time to enter the information needed to create your customs documents. For shipments to non-EU countries, a new section related to “International shipments” will appear in the order edit view.
Fill in these fields with your product information and it will be used to generate the correct type of customs form based on parcel weight and shipping method.
Let’s take a look at the information you need to enter.
Shipment Type
There are five types of customs shipment which you need to select from: Gift, Documents, Commercial Sample, Commercial Goods and Commercial Return.
As on an online retailer, In most cases you will be shipping parcels under the shipment type “Commercial Goods.” You can select your shipping type from the drop down menu when creating your label.
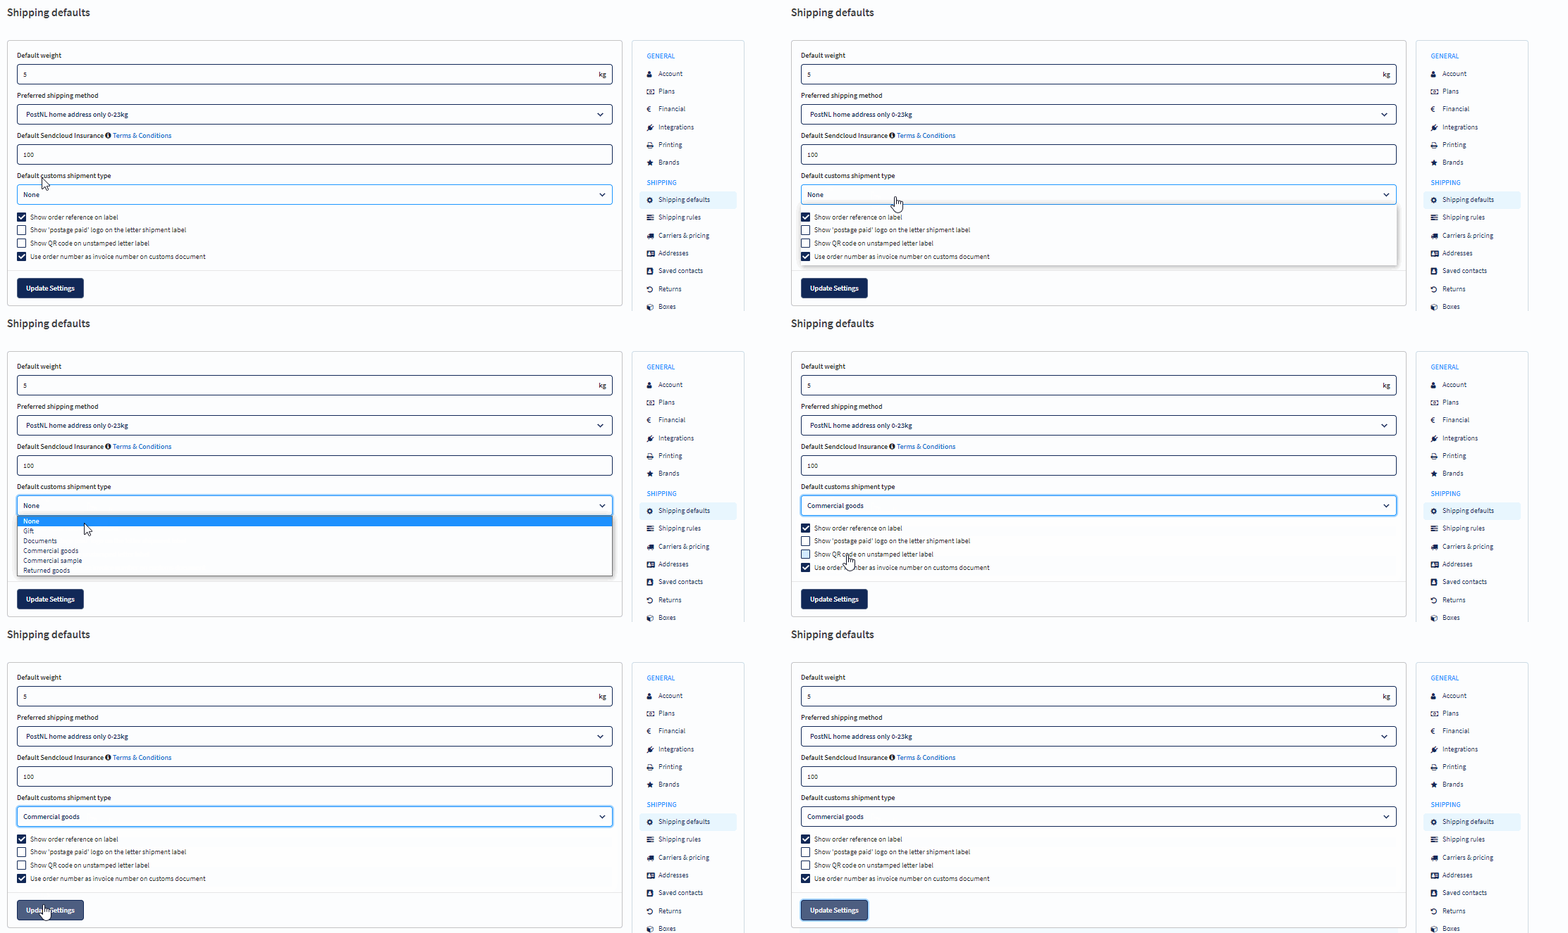
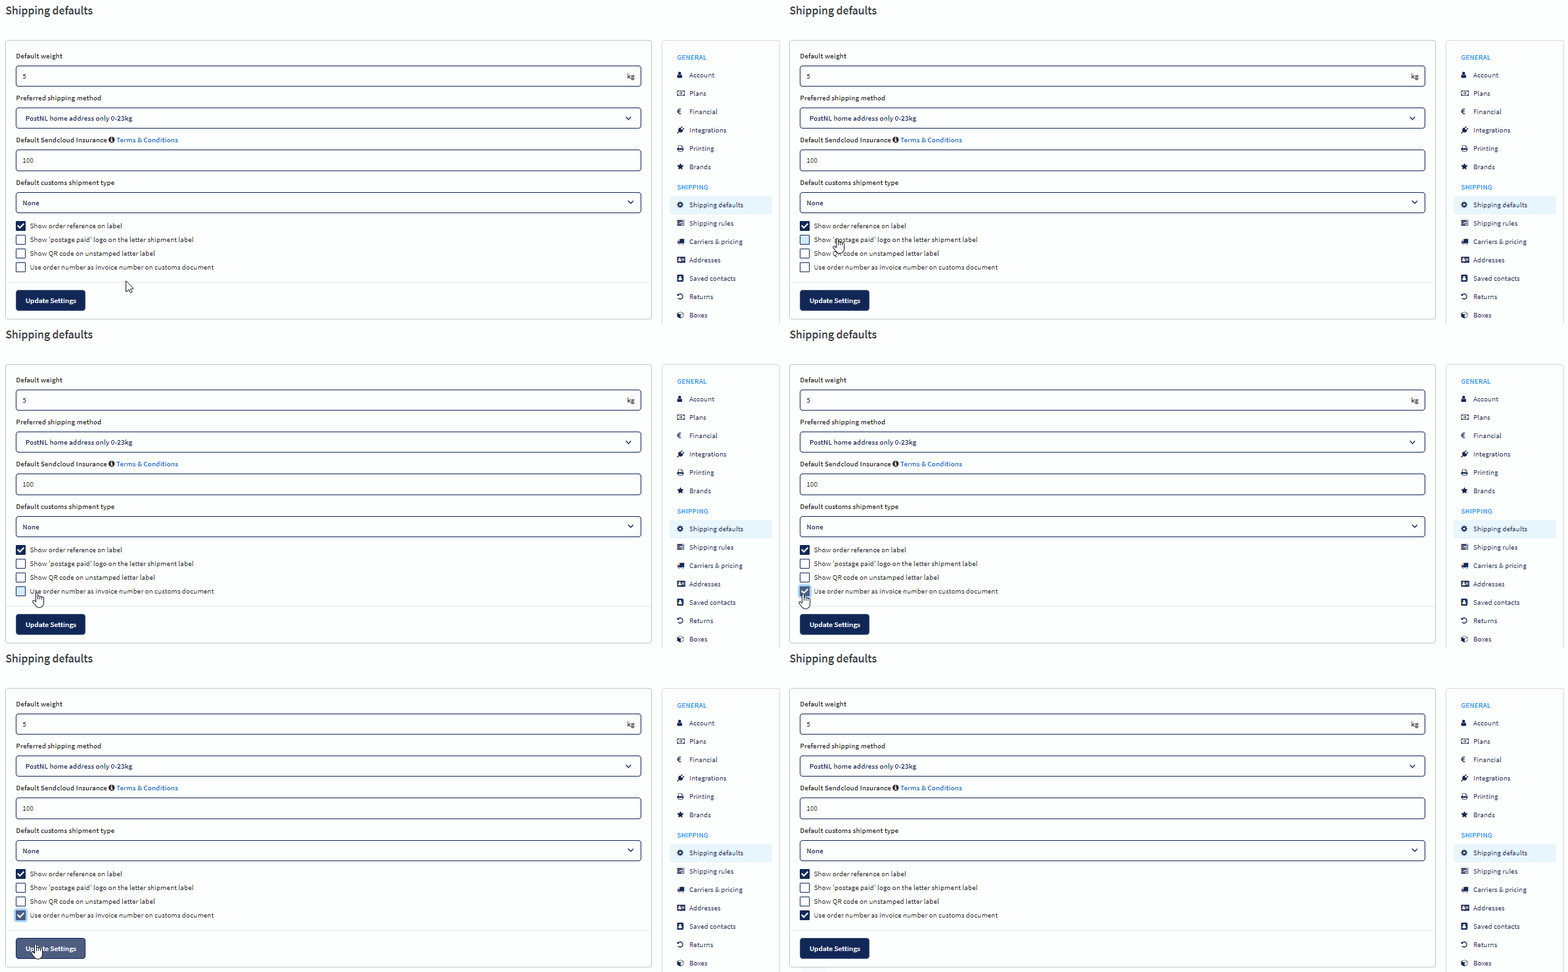
You can save time by saving your usual customs shipping type as a shipping default. Go to Settings > Shipping Defaults and select your preference from the drop down menu. This will now be pre-selected on all future international shipments. One less decision you have to make, and one step closer to a fully automated workflow.
Invoice number
Another essential detail that can be the difference between a successful shipment and a delayed shipment is the invoice number. It’s mandatory to include this on all customs documentation. Enter the invoice number associated with this order into the correct field in the order edit view.
If your order and invoice numbers are the same, you can select this as an option in your shipping defaults. Go to Settings > Shipping defaults and select the option “Use order number as invoice number on customs documents”. The invoice number will now automatically be filled in based on the incoming order number, saving you even more precious time.
Item details
For every product contained in your order, you need to note the description, weight per item, quantity and value per item. This is needed by customs authorities to determine the contents of your parcel and the correct tax amount to apply. Enter the products as they appear in your order. To add a new product, click the “+Add item” button.
Country of origin
Finally, enter the country where your item was manufactured. This information is provided by your supplier or the product manufacturer, or will be stated on the packaging of the product.
VAT & EORI numbers
The problem with creating customs forms by hand is that you’re never quite sure if you’ve provided all the necessary information. Many retailers come unstuck by forgetting this one crucial and often overlooked detail – EORI and VAT numbers.
The EORI number is the EU registration and identification number assigned by the member state of the country you’re shipping from. This number is an absolute must if you want to ship outside of the EU. Make sure you’re never in danger of forgetting to include this essential bit of information on your documents by adding it to your account details.
Go to Settings > Addresses > Sender addresses and enter your EORI number and VAT number into the correct field. Press save when you’re done editing, and these numbers will be pre-filled into the correct location on any customs forms you create. Simple.
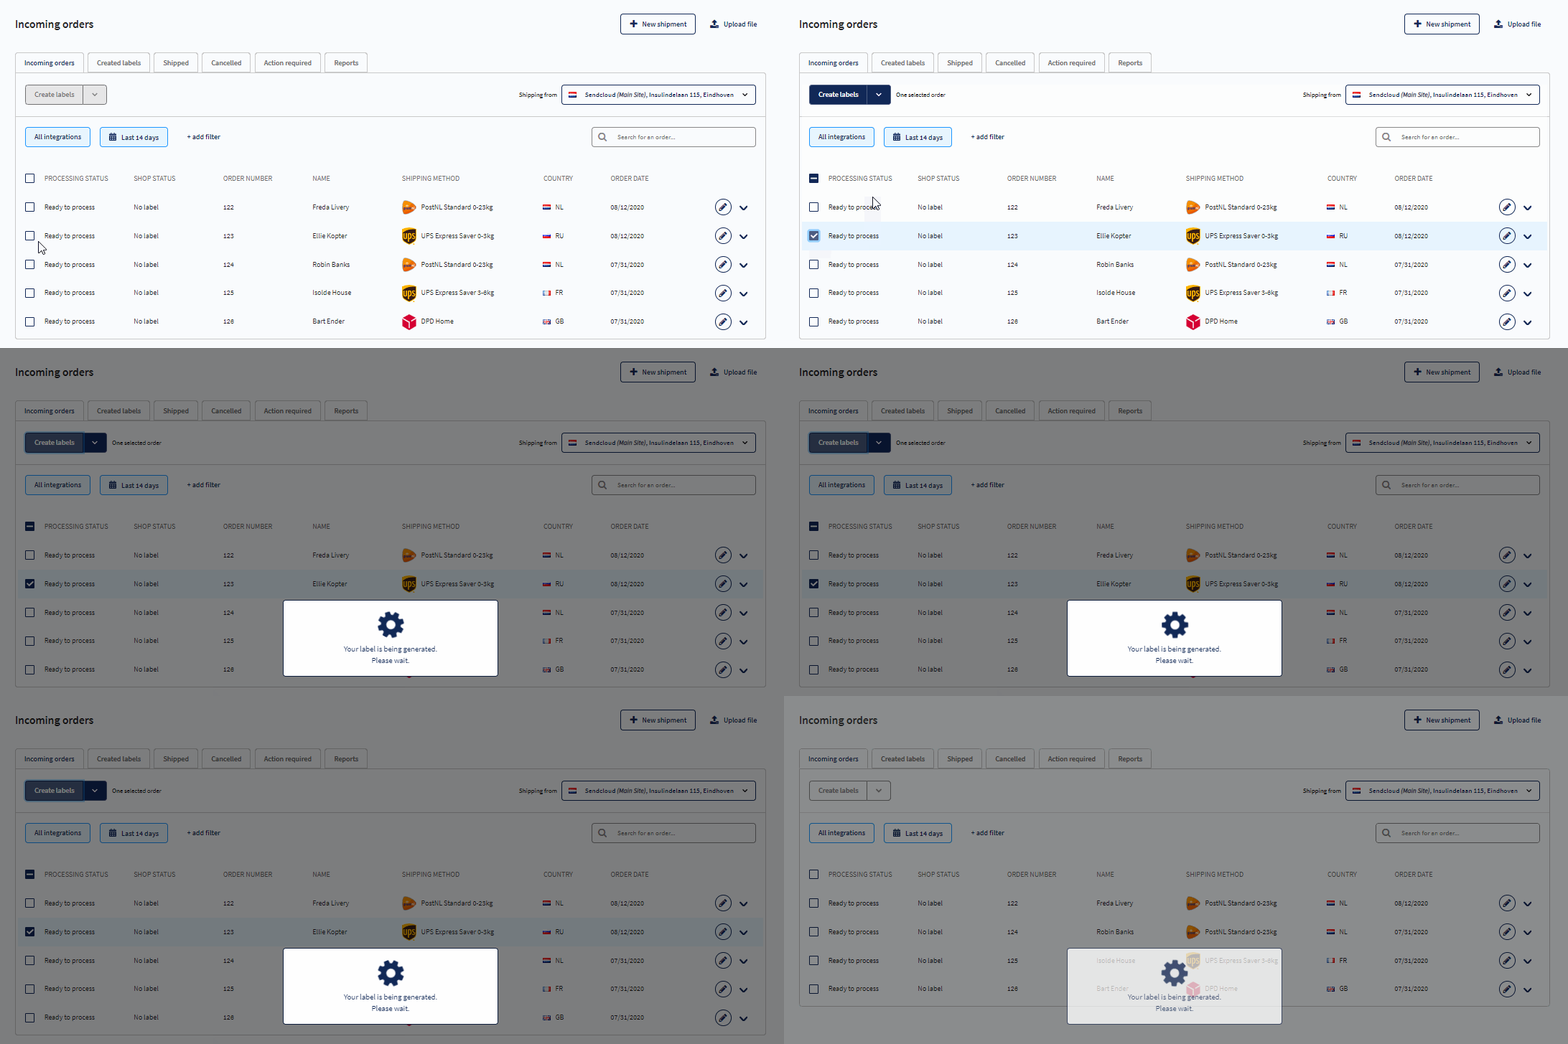
Once you’ve entered all the information required, click Save. It’s time to print your labels. Select the parcels you want to ship and press the Print labels button.
Print your label & your documents in one click
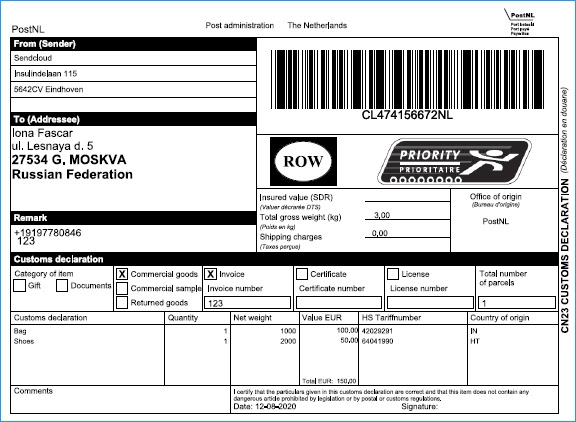
If you are shipping with a postal carrier, the CN23 +CP71 or the CN22 form is printed as part of the shipping label, such as in the example below.
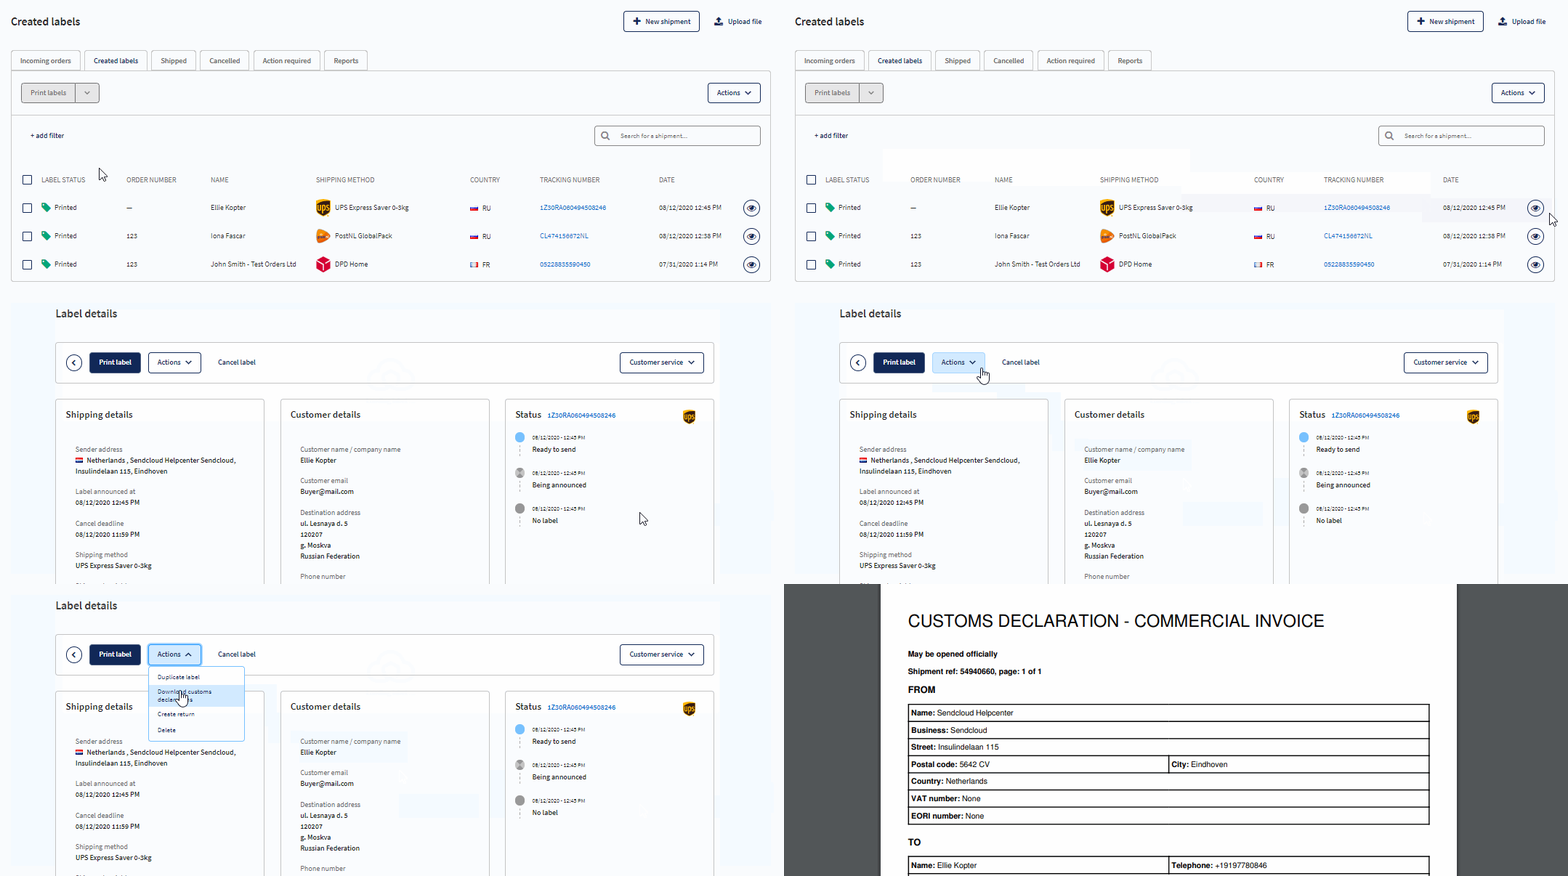
If you are shipping with a commercial carrier, the shipping label is printed immediately. You can download and print the commercial invoice separately.
To do so, go to your Created labels tab and click the eye icon to view your parcel details. From the drop down Actions menu, select “Download customs declaration”.
Go next level with paperless trade
For supported carriers, DHL Express and UPS Express, it’s even easier to ship internationally due to paperless trade. A digital copy of the customs declaration is sent to the carrier as soon as you print the order in Sendcloud.
The documents are electronically attached to your shipment and stored in the database of the carrier. When your parcel receives a scan, customs authorities will be able to view the digital version of the forms. You don’t have to do anything other than package your products up, attach the shipping label and send them on their way.
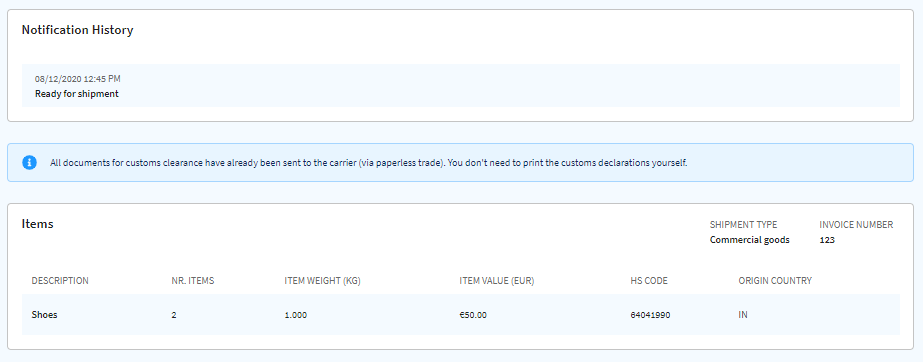
If paperless trade is available you will see the message below in the parcel detail view. This is to let you know that the electronic transaction has taken place.
That’s even less work for you, and a little less paper.
Bon voyage!
It’s time for a final check, and then your parcel’s ready to head out the door. There’s only one thing we can’t do for you, and that’s to make sure you sign and date your customs declarations.
And as a reminder, multiple copies of customs documents are always required. Make sure you print at least three to five copies of your customs form or commercial invoice. Include one copy in the box, and additional copies in a plastic documents wallet on the outside of the parcel.
Did you ever think it would be possible to send parcels worldwide in a matter of minutes? Our new automated customs form generation is designed to save you time, costs and broaden your horizons when it comes to international shipping.
Want to know more about international shipping? Be sure to check out our guide to international shipping from the UK.


